View PDF of Article
May 2015 Issue
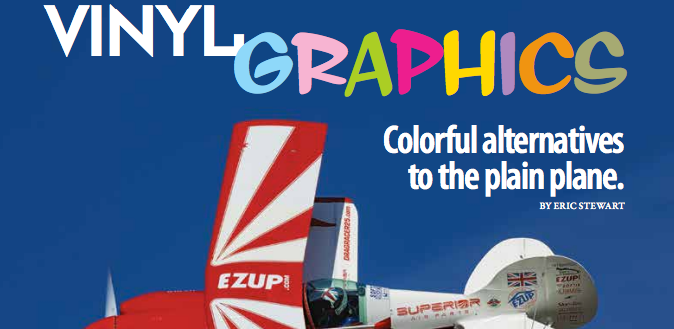
By Eric Stewart
Photos: Eric Stewart
Vinyl Graphics
Colorful alternatives to the plain plane.
With the advent of CNC vinyl cutters, decals—be it N-numbers, tail art, or holographic purple flames—have become readily available and affordable for pimping your ride. At Reno 2014, KITPLANES® caught up with graphics-meister Karl Grove in the biplane pits. If there’s a plane with more decals on it than Karl’s Pitts S1S DragRacer anywhere in the world, we haven’t seen it!
 Vinyl graphics guru Karl Grove in DragRacer at the National Championship Air Races in Reno. (Courtesy of Tim Adams Photography)
Karl works for E-Z Up, a company that specializes in instant pop-up structures for indoor and outdoor trade shows and business. These structures typically feature a company’s logo, and Karl has extensive experience in marketing and branding. It’s clear that Karl has brought this expertise to DragRacer, and we sat down to ask him how a homebuilder goes about getting custom graphics on their plane.
KITPLANES®: Let’s begin with the vinyl itself. What kinds are there and which are best for aircraft use?
Karl Grove: There are a lot of different substrates to choose from. A substrate is the material upon which the printer prints. It could be something as simple as banner vinyl or some type of high-end air-release substrate for coping with compound curves to mitigate wrinkles and bubbles. You’ve got some very modern substrates from companies like 3M and Orafol for lots of different applications, but for aircraft, what you want to look for is a vinyl with non-permanent adhesive. This is because permanent adhesive decals can be very hard to remove, and if you do get it off, it tends to leave a lot of residue. You are then forced to use a solvent to remove the adhesive, which can then harm the aircraft finish, especially on a fabric-covered aircraft like my Pitts.
 Karl Grove’s pit belies his work for E-Z Up: In addition to numerous vinyl decals on DragRacer, his rail skirts, backdrop, chairs, and even team shirts all feature digital graphics. (Courtesy of Karl Grove)
Depending on your decal design, you will either be digitally printing artwork in full color or simply die cutting from a solid color vinyl. An example of the former would be custom artwork for the tail or nose, while an example of the latter would be N-numbers. One of the nice things about custom vinyl decals is that they are backed up to a transfer tape. The transfer tape holds all of the letters, numbers, and images in correct position to each other so that everything transfers to the aircraft exactly as it came off the printer.
KP: Are there any particular brands or year-ratings of vinyl that you recommend?
KG: Yes, you want to buy a vinyl with a UV or aqueous coating, which most exterior-rated vinyls have. If the aircraft spends much time outside a hangar, the decal will turn yellow, crack, and peel if you do not have these coatings. The year ratings [vinyls and substrates are typically given year ratings, for example a 3-, 5- or 10-year rating, with higher-rated vinyls being more expensive] are more meaningful for the vehicle industry since cars are typically outside a lot more than aircraft. As I previously mentioned though, if your airplane is tied down outside, you may want to spend extra for a higher quality exterior vinyl. On the other hand, if you are keeping your airplane hangared, any quality vinyl should last forever. Some of the decals on my Pitts have been on for four years, and they still look brand new.
As far as peeling, I’ve never had a problem with the semi-perm adhesives. We are going over 200 mph and have never had a problem. I know some of the jets are using vinyl graphics as well. I am not an expert on high-speed applications, but I would imagine there are some safety considerations regardless of aircraft, such as not putting a graphic in front of an air intake or where it could jam a control surface if it came off. But as for me, I’ve never had one peel off.
 Karl Grove demonstrates the ease of applying a transfer tape vinyl decal. Only the red and blue sections are vinyl—the white background is actually the airplane. First peel the wax backing from the sticky side of the decal. Position the decal and, starting at one edge, press it against the surface with a flexible applicator (available at any hardware store). The translucent transfer backing holds the elements in the correct relative position while you rub. Once the vinyl is adhered, the backing is peeled away to reveal the transferred image. It’s as easy as that, and many of the new vinyls have micro channels within the adhesive to prevent bubbles forming under the decal as you squeegee. For decals that require positioning, try this: fill a spray bottle ¾ full with water and add either 2-4 drops of baby shampoo or rubbing alcohol (approximately 1 part alcohol to 10 parts water), and lightly mist both the location where the decal will go down as well as the back of the decal. This will allow you to slide the decal around a bit before squeegeeing. You should be able to squeegee out most of the solution, and what little remains will eventually evaporate through the decal.
KP: Will washing the plane damage the vinyl?
KG: Not at all. I recommend using a mild soapy solution, and you can actually wax over the decal as well. You just need to be careful not to lift up the edges. As long as the digitally printed decals have been laminated, you are not going to damage the printing. That is an important point; after decals go through the printer, they then go through a separate process on a laminating machine, which essentially clear coats the decal with a protective layer. So you want to avoid harsher chemicals like acetone, since they will eat through the laminate or any vinyl for that matter. If you buy a pre-made vinyl sticker like a flag or whatnot, most likely it will have been laminated. However, if you have a graphics store custom print your graphic, you need to specify to them to laminate it after printing.
 The left edge of this decal lost color when exposed to a mild solvent because it had not been properly laminated.
For removal of both permanent and semi-permanent decals, use a heat gun to soften the adhesive. I would not recommend using a hair dryer—it’s not the right tool. With a good heat gun you have more control, and you know exactly how much heat it is putting out at the different settings. If it is a metal aircraft, it’s not so crucial—you can get it fairly hot. But on a fabric or composite aircraft, you obviously don’t want to get it too hot or you could cause serious damage. So use a low setting, hold the gun six to eight inches from the surface, and keep the gun moving over the whole decal for 30 to 60 seconds. It should be hot to the touch, but not burn your fingers. That is the point where you can grab an edge and it should just peel off in one go if it is semi-perm.
With a perm adhesive, if you are lucky the decal will lift. But more likely than not it will break, and you’ll spend a significant amount of time peeling it off flake by flake. Although I suppose some might be tempted to cover the offending decal with an even larger one, I would recommend against this.
 Bruce Eicher’s RV-8 Hula Girl is an excellent example of all that can be done with vinyl. Amazingly, the only paint on the entire airplane is the yellow cowl and spinner. Everything else is vinyl. Although it features a variety of WW-II motifs, Bruce says Hula Girl’s color scheme is not based on any particular warbird. (Courtesy of Bruce Eicher)
KP: Can you give some tips for creating the artwork itself?
KG: Regardless of whether you do the artwork yourself or have a graphic artist do it, the first thing is to make sure you understand the difference between a vector-based image and a rasterized image. A vector image is scalable without becoming pixelated or loss of resolution. A rasterized file, on the other hand, is an image of fixed resolution that will lose definition if it is scaled up. Now, there is some software out there that can scale up rasterized images, but only so far. When it comes to logos, you are almost certainly going to be designing something that is a vector-based image because you might want to scale that image down for a business card or scale it up to put on a billboard. The size limit is really only the size of the machine printing the image.
 The Hula Girl artwork was a purchased Photoshop art file (no longer available) from an online stock house, while the Hula Girl font came from a shareware (free) download called Brush Stroke Fast. (Bruce married his wife Katie in Hawaii; hence she is his Hula Girl and G.I.B. [Girl in Back]).
 As anyone who has polished an airplane knows, polishing the underside can be a headache. Wrapping the wing bottom precludes this. Although Hula Girl’s invasion stripes stop at the leading edge, some polished planes run the stripes over the top as well to reduce potentially canopy-melting reflections from the polished wing. Note the machine gun ports, which Bruce photographed on a museum P-51 and then had printed at a local sign shop along with the rest of his graphics. (Courtesy of Bruce Eicher)
There are numerous software packages for creating images. Photoshop is OK, but Adobe Illustrator is the tool of choice, and that is where you design vector-based imagery. Everything you see at my booth—airplane decals, partition walls, shirt logos—was designed on Illustrator. In fact, I drew the airplane in Illustrator to meet the RARA requirement to show egress and location of the battery and fuel.
However, if you’ve never used Illustrator before or have no design experience, there is a pretty steep learning curve. There are some free, simple programs out there if you want to give it a try before investing in Illustrator, but if you don’t have any experience at all, it might just be better to go to a professional.
 In keeping with Hula Girl’s military color scheme, the fuselage sides sport typical WWII-markings. Bruce notes that he applied the major pieces of vinyl before polishing, but not the detail graphics such as lettering or stars and bars. This worked out fine, but he did note that polishing before applying vinyl might have saved time spent masking. See the June/August 2014 issues of KITPLANES® for a two-part article on polishing. (Courtesy of Bruce Eicher)
If you are looking to outsource the artwork, I’d suggest talking to a car wrap company to begin with. Often those companies can do simple decals, and they understand vehicle applications. They’ll know the best substrate for the local climate, and they should have access to graphic design resources or personnel. That said, if you actually want to wrap the aircraft, I’d suggest a company that specializes in aircraft wraps like AircraftWraps.com.
As far as copyright issues go, you need to be careful. A lot of large companies are very aggressive against intellectual property infringement and do not want you printing their logos. I can’t imagine why you would want to put someone’s logo on your aircraft that isn’t a sponsor, but it’s not recommended. Especially at a place like Reno where there is so much media exposure, you are asking for trouble if you have copyrighted logos without permission.
 Glasair III full wrap by Plane Vinyl, Inc. Company owner Dan Black recommends full wraps be done by professional certified aviation wrappers, since other retail wrappers may not be aware of special requirements for aircraft (not covering static ports, providing for drain holes in control surfaces, etc.). (Courtesy of Dan Black)
KP: What are vinyl graphics likely to cost?
KG: If you have the image file already, a simple decal or logo the size of a business envelope will run about $10. Expect to pay slightly more if it’s to be die cut, which I highly recommend over cutting it out yourself with an X-Acto knife.
Design work is where it gets expensive—anywhere from $45 to $85 per hour. For just a simple text-based logo, this could probably be done in an hour. If it’s a custom image that requires tweaking of size, colors, and wrapping with text, 5 to 10 hours is not uncommon. However, even if you leave the artwork to someone else, providing examples of similar artwork that you like, examples that you don’t like, or even a hand-drawn sketch can help the designer quickly pinpoint the aesthetic that you are looking for. Having colors and letter fonts already chosen is also something that is easy to do ahead of time and will reduce the billable hours.
KP: Your pit looks like one of the Unlimited camps—you’ve got decals not just on the plane, but on chairs, back walls, partitions…
KG: Yes. E-Z Up is one of my major sponsors, and they’ve been behind Drag-Racer since we first came to Reno four years ago. So the partitions, rail skirts, shirts, etc. not only give an instantly recognizable look to the DragRacer pit, they also allow me to showcase my other sponsors. So if you come up with some custom artwork or logos for your airplane or business, companies like E-Z Up can provide an integrated package of products to add some pop to your hangar or workshop.
Check out Karl’s future Reno rides at www.groveaero.com.
Artist Jerri Bergen of Victory Girl (www.victorygirl.com) has created nose art for hundreds of clients. We asked her to explain what’s involved.
KitPlanes®: What’s the basic process for creating a custom image?
 Precious Paula’s nose art started out as a sketch of the pilot’s wife.
Jerri Bergen: I usually first make a quick sketch or use a sketch provided by the client, and then make a painting from the sketch once the client gives their approval. I then send the file to a local vinyl shop to print and cut. What takes the most time, of course, is painting; creating the sketch is not terribly hard, especially when a client already has an image sketched or printed out. But a lot of times they say, “Put my wife in front of a Corvette,” and that’s where I draw on my creative skills as an artist. I understand the anxiety some people feel by being unable to get an image out of their head and onto paper. So my job is to help with that, to envision what they are after. Once they have a sketch in front of them, it’s much easier for them to say, “That’s exactly what I wanted,” or “No, that’s not it—can we do something else?”.
KP: What is the typical turnaround time and price of a project?
 The final image in full color vinyl on the plane. (Courtesy of Jerri Bergen)
JB: Timewise, I try to work by the client’s schedule. Depending on the complexity of the project, turnaround is typically 10 to 15 business days. I have clients all over the country, so most of this is done via email.
A full image may run between $600 and $1,100, which includes decals on a high-performance vinyl called Arlon—it’s a great material for airplanes and is what I prefer to use. If the client has an image that doesn’t require repainting or only minor design work, it may be as little as $150 to $300. It just depends on how much time we spend. To put it in perspective, I like to tell clients, “You are probably going to pay less for this than for one set of tires that may last you three years—and this could last the life of the plane.” I also give the client the electronic files so that they can do reprints if necessary in the future, or use the image elsewhere, like on a shirt or business card.
KP: If a client brings in an image from a book or the Internet—say a Vargas girl—is that legal to use? How do you distinguish between public domain and copyrighted material?
JB: That’s an excellent question, and the answer is often fuzzy. Much nose art we see today is derived from artwork put on WW-II combat aircraft, and that art was re-creations of pinups by Vargas and other pinup artists of the time; those images have become public domain. The most important distinction is whether the end use is personal or commercial. A design for your personal plane is considered personal use and does not violate copyrights. However, once I create that design, I would not be able to sell it, nor could the client use the image commercially for a company logo, web site masthead, T-shirt design, etc.
If the client did want to use an image commercially, we would either change the image enough to be considered original, or get permission from the original artist. We’ve done both here at Victory Girl. And there are always exceptions: Disney created over 1200 squadron insignias for the military during WW-II, yet today the Disney Company does not permit recreating those images for commercial use. For example Disney denied our request to recreate a “Dopey” nose art image for a P-38 national association T-shirt design.
KP: Any particular subjects to be careful with?
JB: Yes, we have had clients receive negative feedback on images that were deemed anti-Semitic or misogynistic; some people are simply not aware that German kill markings or Vargas-type nose art are historical images. My best advice is that if it’s the least controversial, show the artwork to an objective third party for their impressions.
—E.S.

I commissioned an artist (my father, David Gamble) to draw a nice picture to put on the nose of my RV-6, more or less to play along with the military fighter motif. The resulting picture was delivered as a colored pencil drawing on coarse paper. The first step was to digitize it using a digital camera. That was the easy step— the next step was to spend many, many hours making the colors clean and solid. This necessitated a foray into the exotic and esoteric skills needed to work in a complex digital editing program called GIMP, which is a fantastically powerful tool in addition to its best feature: it’s free. Working at what felt like the molecular level (i.e., pixels) was the only way to get the crisp edges for a high-quality image. After printing the image in color and taping it to the airplane to confirm the dimensions, I contacted a vinyl printing outfit and had the final image printed.
– Dave Gamble, N466PG
